EXAQ
Reference Index

NaturallySpeaking
Roaming User Profiles
 

Relative to: Version 9.x

Rev 1.0
PDF


Starting with NaturallySpeaking 8, users can access voice files from a central server using Roaming Users.  Enabling Roaming Users to make a Roaming profile available while roaming involves 3 steps.

1.          Identifying the Roaming User Directory on the Server

2.          Enabling Roaming Users

3.          Creating the User Profile

Converting a Local User Profile into a Roaming Profile

Converting a User Profile created locally into a Roaming Profile involves a slightly different procedure.  After setting up the Roaming User directory and Enabling Roaming Users according to steps 1 and 2, see Copying a local User Profile to the Roaming User list at the bottom of these instructions.

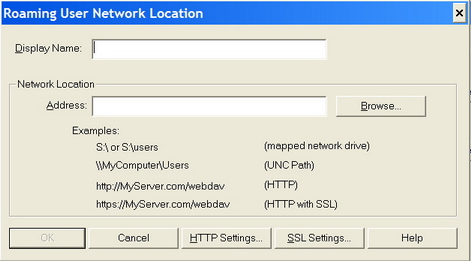
1.      Set Up the Roaming User Directory.

The Roaming User profiles must exist on a directory that will be available from any computer that will be used with NaturallySpeaking.  Most organizations provide users with a personal drive such as U: or S: for their personal files and which is available from any computer that they log into.  The Roaming User directory should be located on this drive.  Create new directory on the drive such as "DragonRoaming".  So if the personal drive was U: the directory would be U:\DragonRoaming.  In the instructions below "x:" refers to the appropriate network drive.

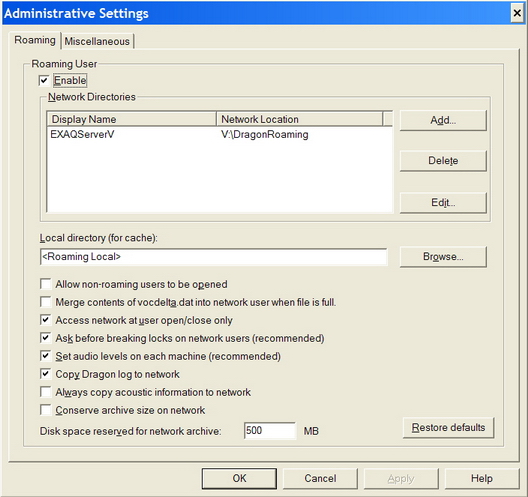
2.      Enabling Roaming Users.

Roaming Users is enabled from the Administrative Settings ... options on the Tools menu on the DragonBar.  The Administrative Settings can not be accessed if any users are open in NaturallySpeaking (so this process can not be completed by voice).  To enable Roaming Users:

  1. Close the NaturallySpeaking User if one is open.  (On the Dragon Bar click NaturallySpeaking then Close User)

B.         Access the Administrative Settings Screen (On the Dragon Bar click Tools then Administrative Settings ...)B.         Access the Administrative Settings Screen (On the Dragon Bar click Tools then Administrative Settings ...)

C.         On the Administrative Settings screen

Admin
  • Click Enable
  • Click Add

D.  On the Roaming User Network Location Screen
Settings

a)     Enter a Display Name that will be displayed on the “Open User” screen

b)     Network Location Address: Enter the Network Directory for YOUR server, i.e. S:\DragonRoaming

c)     Click OK for the Network Location screen and OK for the Administrative Screen

d)     Click Yes to create the Local Roaming Directory.


3.      Create a User profile

  • Open the Open User screen (On the Dragon Bar click NaturallySpeaking then Open Users)
  • Click New
  • Type in the Name for the profile.  If using the Medical version remember to select the proper Medical Specialty Vocabulary from the Vocabulary drop down list.

To use the roaming profile on any computer with NaturallySpeaking 8 installed, simply complete steps 1 and 2 above, then open the user.  You may be asked to complete the Audio Setup Wizard to set microphone levels, then you can begin using NaturallySpeaking.

Copying a Local User Profile to the Roaming Users List

This alternate procedure need only be completed if a Local user was created prior to enabling Roaming Users and needs to be copied to the Roaming Profile directory.


Start with the same procedure for creating a Roaming Profile listed above.  After Roaming users is enabled and configured:

  1. Click NaturallySpeaking, Manage Users
  2. Select the user to be copied to the Roaming Directory
  3. Click Advanced
  4. Click Save to Roaming
  5. When complete (hour glass will go away - may take a couple of minutes), click close

The Local User profile should now be available as a Roaming User.  Click NaturallySpeaking, Open User to open the Roaming user


Dragon NaturallySpeaking is a registered trademark of Nuance Communications